


How to create and complete manufacture orders (Windows)
You can assemble kits and build finished products from raw materials and/or components with work orders. See below for full details.
Please note: This feature is only available on select plans or add-ons .
Creating work orders
Article shortcuts
- How to create a work order
- How to partially complete a work order
- How to create a work order directly from a sales order
- Download inFlow Cloud for Windows
Webinar

How to create a work order
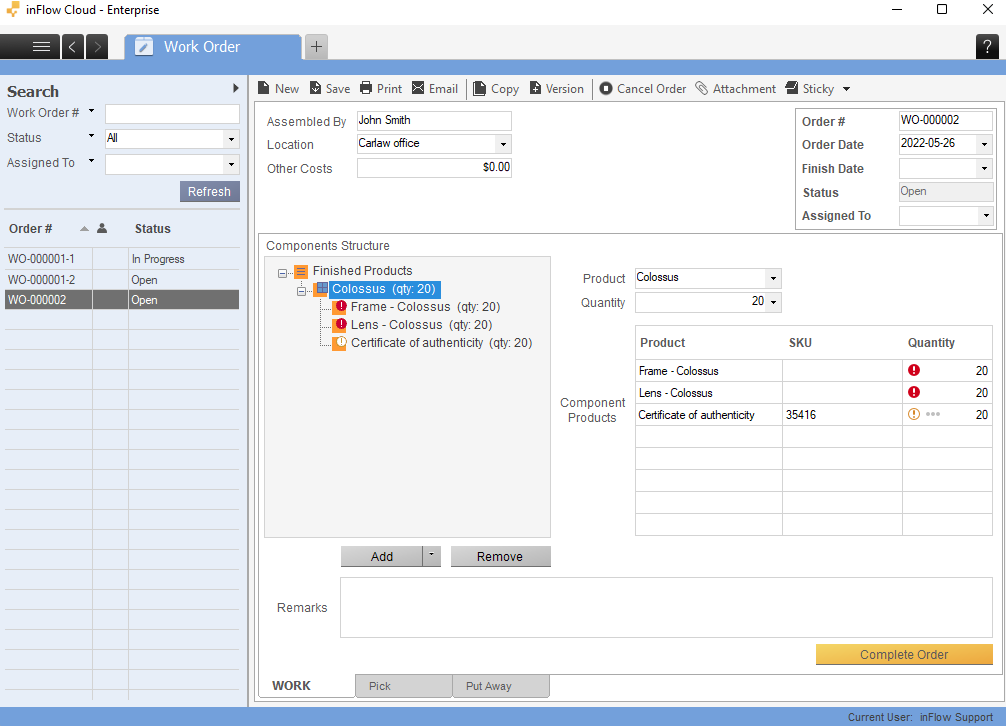
Work orders don’t need a bill of materials to be set up first, but it makes things easier if they’re already set up. If you do custom work, you can assemble finished products from a blank work order and add the components to the work order on the go.
inFlow will not complete your work order if you do not have enough components in stock. Right-click on the red exclamation marks (not enough stock icons) and click Reorder stock to quickly generate a reordering for your items.

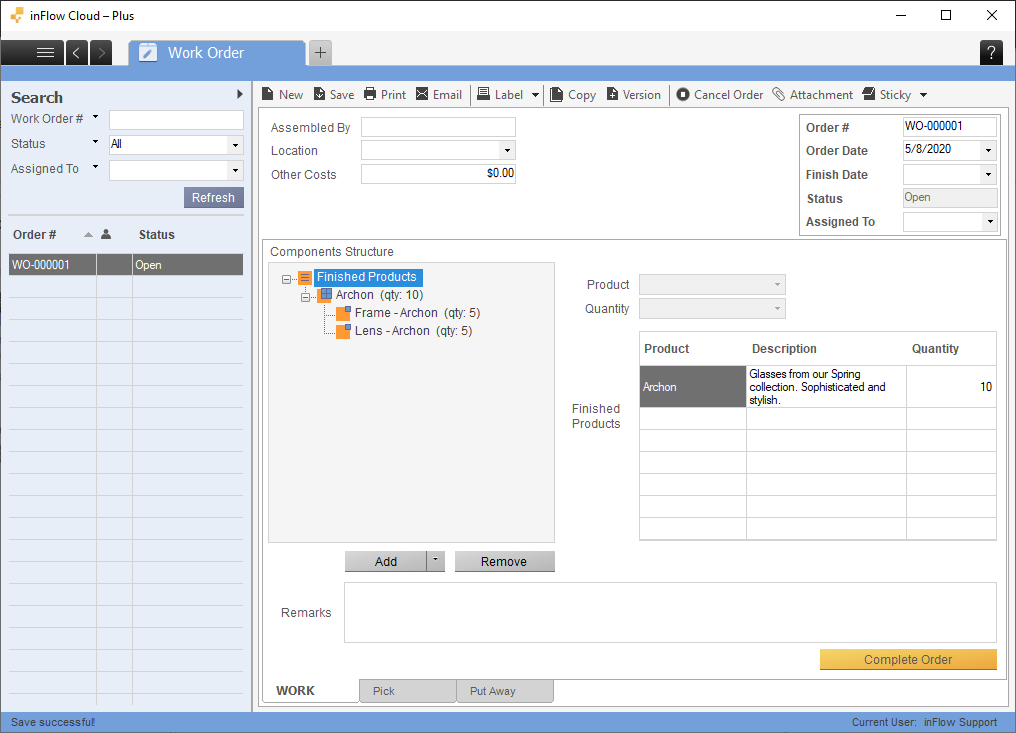
If you prefer, instead of clicking the Complete Order button, you can also click the Pick tab at the bottom and manually pick the components, and then click the Put Away tab to stock the finished product.
By completing the Work Order, the system will reduce the stock levels of your components and add stock to your finished product. From there you can sell the finished product in a sales order. You cannot sell the item in order to deduct components – your work order must be completed first.
How to create a work order directly from a sales order
It’s possible to create a work order directly from the sales order screen, only if you don’t have enough stock for that item. If you make your products to order, you should ensure that you have stock of your component items. There are two ways to do this, depending on what you want.
Create one work order for one specific sales order
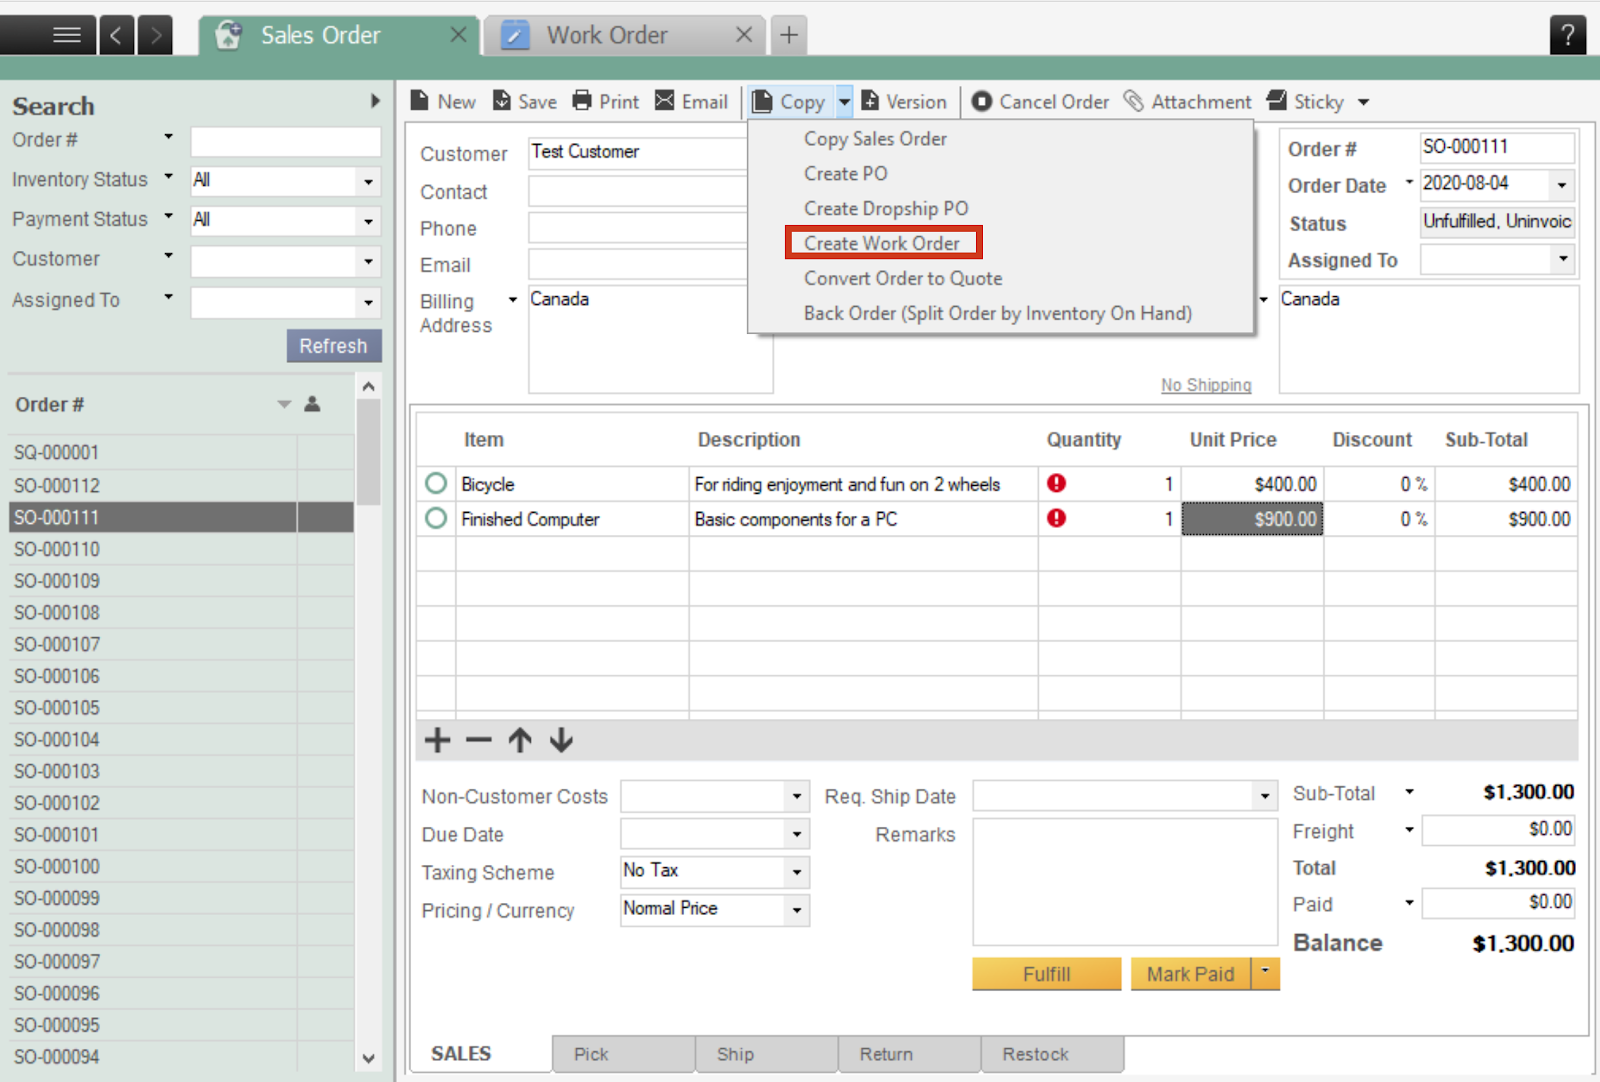
If you want to keep track of work orders corresponding to specific sales orders, click the Copy button at the top of the sales order and click Create Work Order. This creates a single work order containing the items for that sales order only, even if you have to create more of the same item for other sales orders.
Tip: It’s also a good idea to keep the work order number the same as the sales order number (e.g SO-000111 and WO-000111) for easier lookup.
Using the example above, you would end up with a work order for exactly 1 Bicycle and 1 Finished Computer.
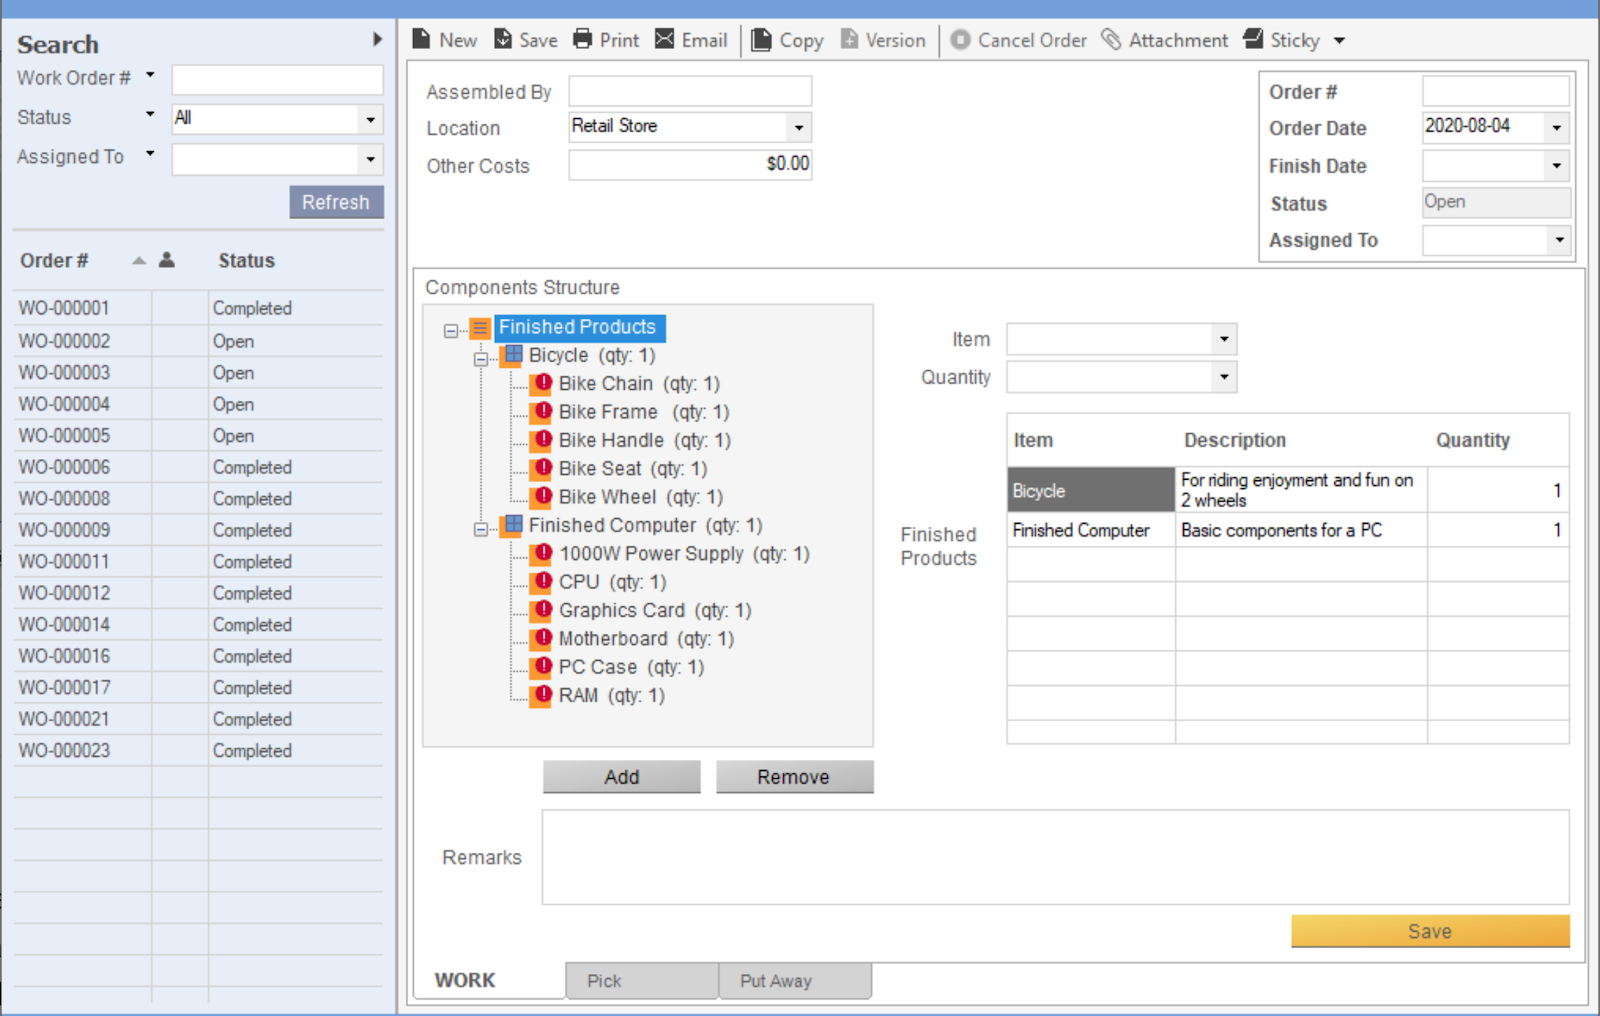
Using the copy and Create Work Order button, will automatically create a new Work Order with all the items that need to be built for all items that have a Bill of Materials set for the item record.
Create work orders for all sales orders
If the items you’re assembling are also listed in other open sales orders, this method allows you to build them all at once. To do this, right-click the red exclamation mark on your sales order, and then click Reorder Products. This will open up the reorder window and the items needed to be built in work orders can be created by hitting Reorder. It will create a work order for each item that contains the items you need to build, but the quantities would be higher to account for the other open orders and the reorder point.
Any other finished goods that aren’t in the original sales order are not included.
Using the method above, you would end up with two work orders in which one will contain the Bicycle item and the other will have the Finished Computer, with a quantity of at least 1. If you’ve got other sales orders and reorder points for the two items, they’ll be added to the work order so you can make them all in one go.
In the example, it would create 4 Bicycle and 3 Finished Computers, as it uses the current anticipated qty and the reorder point to determine the amount needed to be reordered.
How to partially complete a work order
If you need to, you can split a work order into two: one to assemble right away and the other to leave for later on, if you are only assembling them partially.
Please note that you can only split a work order for one product at a time!

To split a work order:
- Create your work order and add a finished product to assemble, along with its quantity.
- Right-click on the finished product line and select Split some into new Work order...
- A window will pop up asking you how many of these items you would like to split into a new work order.

inFlow will then split the work order into two based on the quantity you’ve entered (e.g if you were going to make 20 of the item and decided to split 7, the work orders will have assembled quantities of 13 and 7 respectively, along with the calculated components).
Updating a work order
Article shortcuts
- How to swap out a component product
- How to update quantities of the components on a work order
- Download inFlow Cloud for Windows
How to swap out a component product
If the product you’re creating already has a bill of materials set up, those component items will be listed below the finished product. You can also change component products by removing them and adding a new component to the list.
- Right-click on the name of the finished product.
- Select Add Component Product.
- Start typing in the name of the product, or click into the drop-down field to select the product.
- Enter the quantity you’d like to add to the work order, then click OK.
- Right-click on the original component, then click on Remove item.
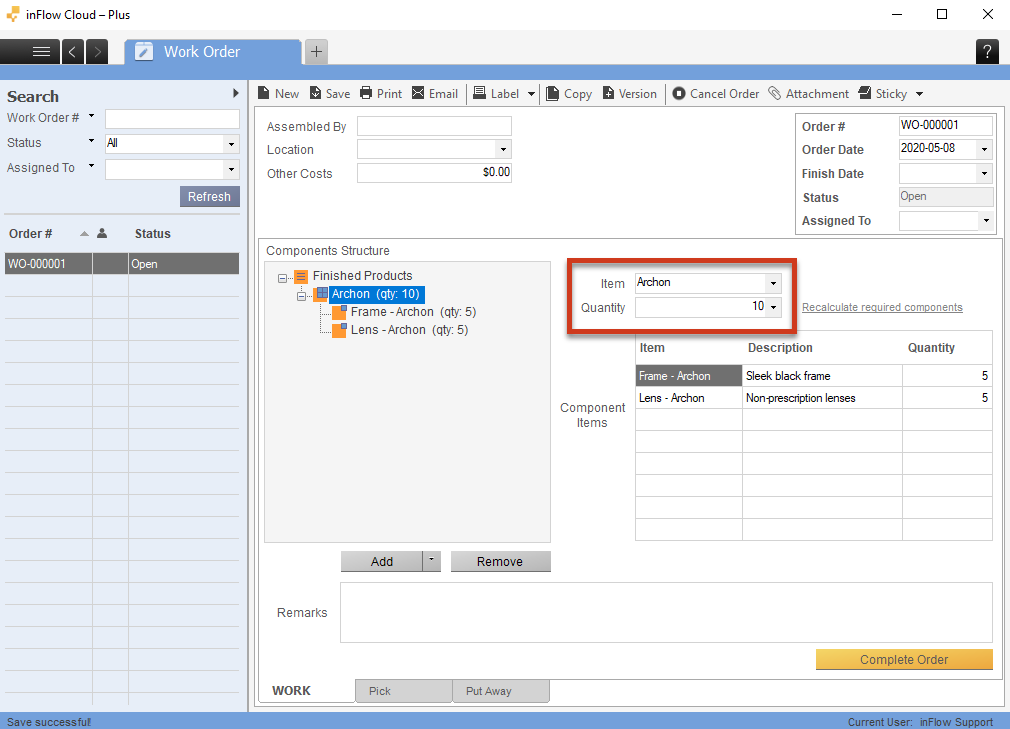
How to update quantities of the components on a work order
Recalculate required components
Occasionally you may want to change the amount you’re making instead of the quantity you’ve set above. You can do this in the same order without having to cancel and re-do it!
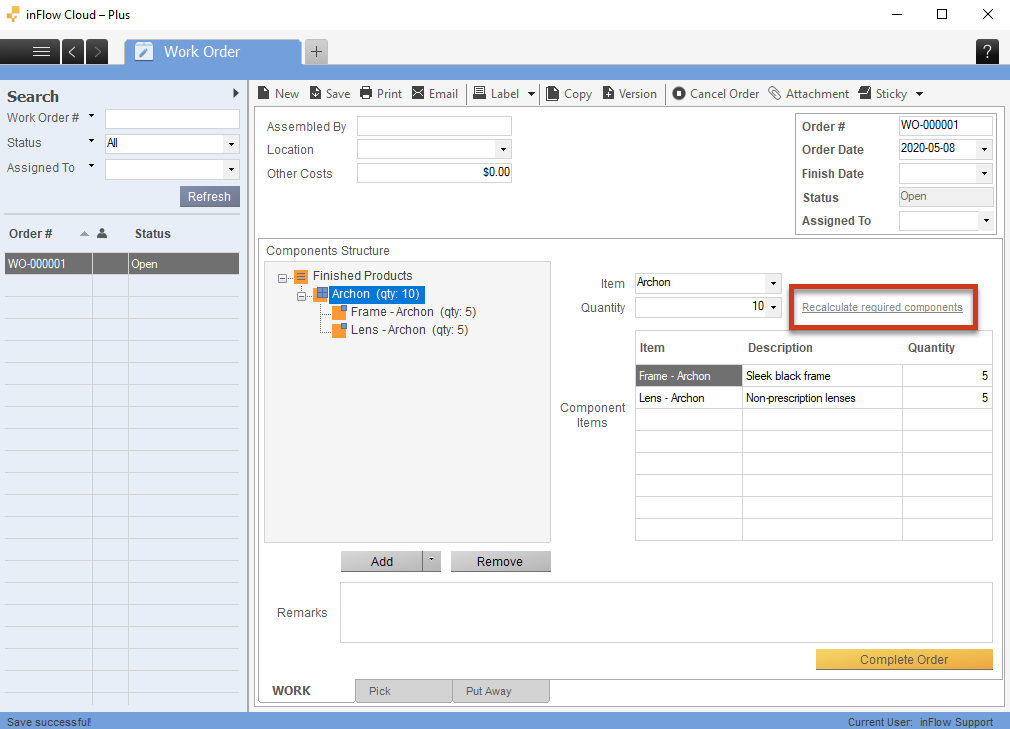
Simply click on the finished product on the left table (so it’s highlighted in blue), then change its quantity on the right:

You’ll notice that the components did not update correspondingly — all you need to do is click the Recalculate required components button at the bottom of the table. The quantity of the components will update to match based on your Bill of Materials!

Subassemblies
Article shortcuts
- Adding subassemblies to your bill of materials
- If you don’t have enough in stock of your subassembly
- Download inFlow Cloud for Windows
Subassemblies
Do you make your products out of items you’ve assembled ahead of time? We call those items “subassemblies” and if you don’t have enough of them in stock to make your final product, there’s no need to create a separate work order to build them first.
Instead, you’ll see those items displayed with their own components listed in a work order for the finished product. You can also split a subassembly into its own work order!
If you haven’t set up your bill of materials take a look at this guide to learn more.
Adding subassemblies to your bill of materials
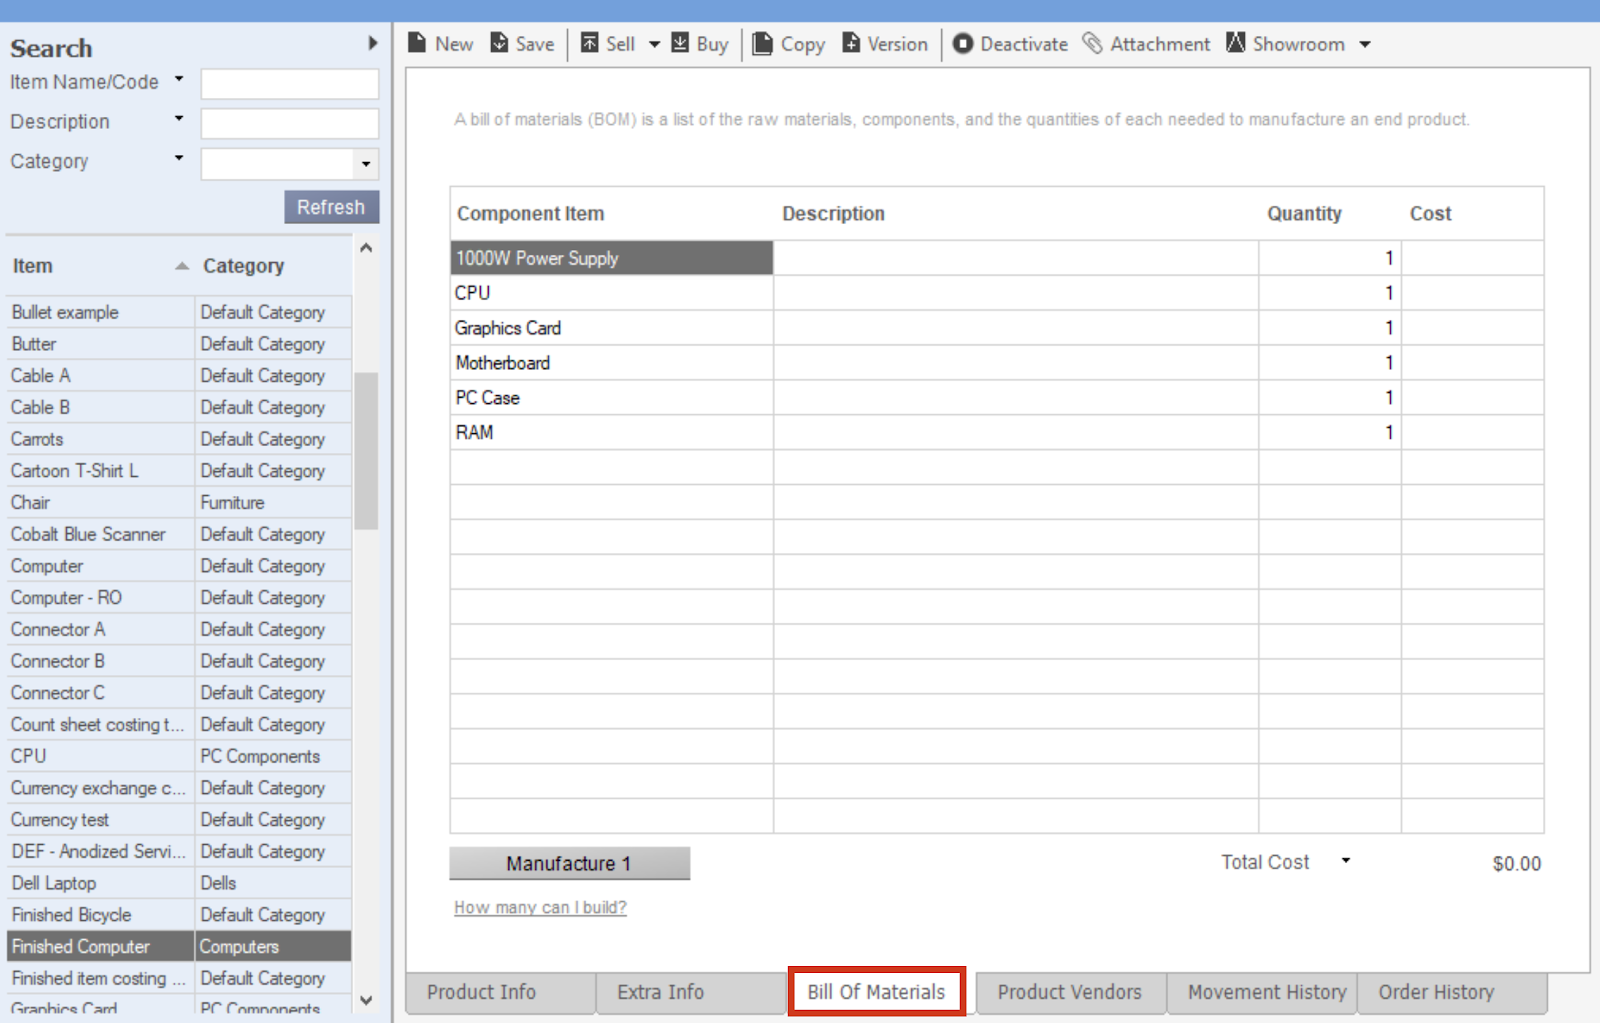
When setting up the bill of materials (BOM) for your finished product, inFlow will calculate your product’s cost based on the cost of its components.
If your subassembly is showing a cost of $0 in the BOM, it means that there is no cost associated with it in its product record. You can manually update the cost yourself, or build the subassembly first to have inFlow calculate the cost for you.
The cost of your finished product will be updated by inFlow in the product record only after a work order has been completed.
If you don’t have enough stock of your subassembly
If you don’t have enough of the subassembly available, inFlow will ask you to build this subassembly in the work order for your finished product. You can also choose to split the subassembly into its own work order so that you can build the subassembly separately.
Have inFlow build the subassembly in the same work order:
Instead of just seeing your subassembly listed, you’ll see its components listed too (as in the image below).

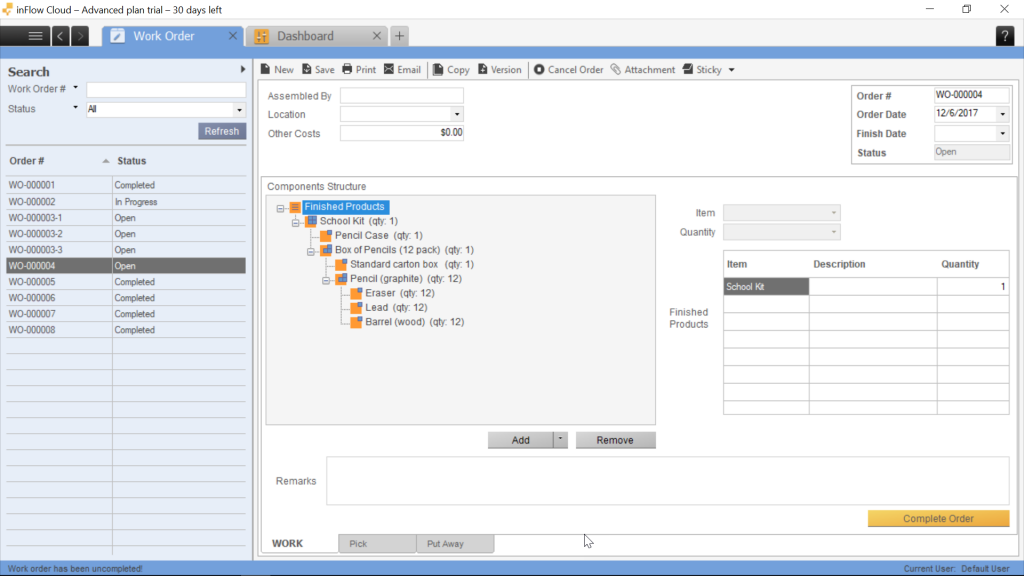
In the example above, Pencil is a subassembly of the Box of Pencils (12 pack), which itself is a subassembly of the finished product, the School Kit.

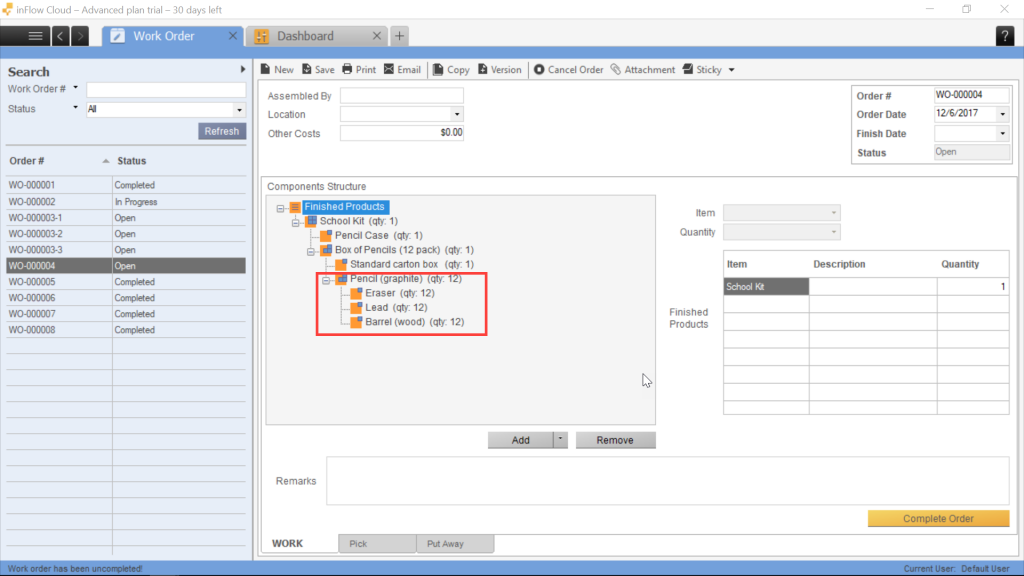
There aren’t enough Pencils to fulfill the work order, but since it has its own bill of materials, inFlow will list its components (Eraser, Lead, Barrel) as part of the larger work order for the finished product, Box of Pencils (12 pack).
When you click “Complete Order”, inFlow will update the quantities of the items used in your work order. In this case, it would reduce the quantities of Erasers, Lead, Barrel, and Pencil Cases and increase the amount of your finished product, the School Kit. Notice that since the subassemblies are used right away for your finished product their individual quantity on hand stays the same.
*Note: inFlow will not complete your work order if you do not have enough components in stock. Right-click on the red exclamation marks (not enough stock icons) and click Create Purchase Order to quickly generate a purchase order for your items.
Split the subassembly into its own work order:
If you don’t have enough of your subassembly, instead of inFlow building it out in the same work order as the finished product, you can split the subassembly into its own work order and build it there.
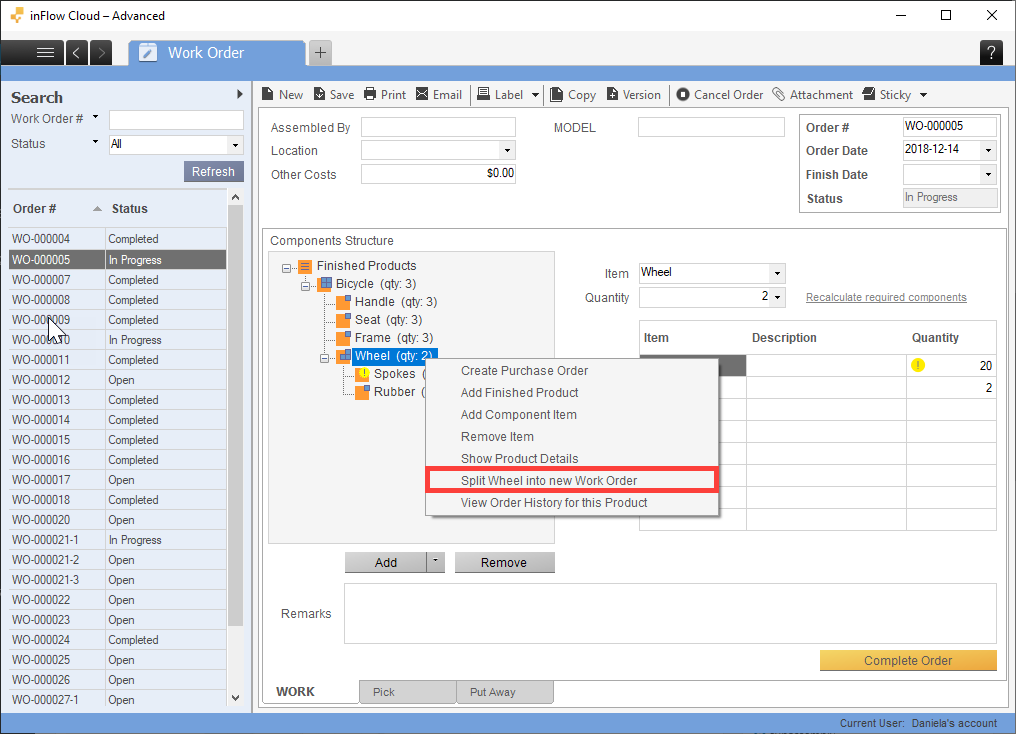
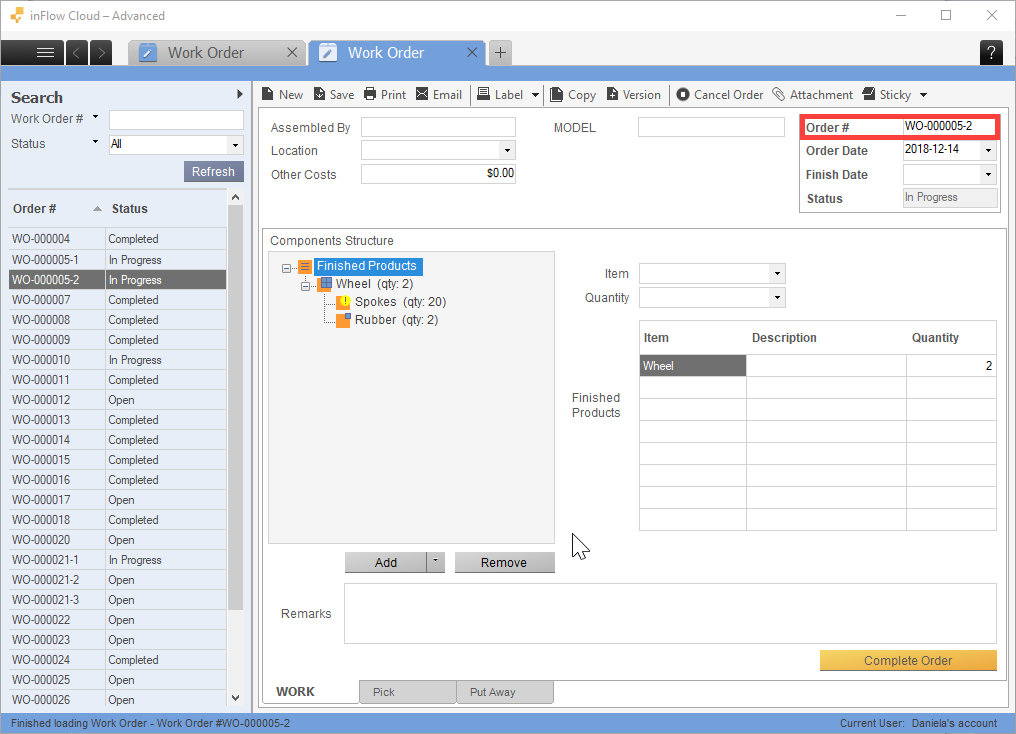
Right-click on the subassembly and select Split into new Work Order. inFlow will create a new, separate work order for this subassembly.

When this work order is marked as complete, the parent work order will no longer show the expanded view of components for that subassembly since you now have enough of it in stock!
Tip: The Order # will automatically be set to match the parent work order to easily track which work order the subassembly was split from.


0 Comments