


How to import stock levels/inventory quantities into inFlow
In this article, we’ll focus on how you can import your inventory levels/quantities. We recommend setting up your product details first before attempting to import quantity levels.
If you’re using FIFO or LIFO costing, creating a purchase order is the only way to update your product costs. For more on how to import purchase orders take a look here.
CSV Setup
Setting up your spreadsheet file
Start with a spreadsheet and create the following mandatory headers/columns:
- Product
- Location
- Quantity
These are required fields to ensure a successful import. Fill in your spreadsheet with the details of your items. Here are some things to note:
- The Product name in the spreadsheet must exactly match the name in inFlow Cloud.
- If a Product name in the spreadsheet does not exactly match a record found in inFlow Cloud, a new product record will be created for that item.
- You may also add the optional headers/columns of Sublocation and Serial Numbers.
If you intend to track sublocations (optional) such as aisle or bin numbers, be sure to turn the sublocation option on otherwise you won’t see them after the import!
For this type of import, you may repeat the product name multiple times in the spreadsheet; this allows you to specify different quantities, locations, and serial numbers (if applicable) associated with one item
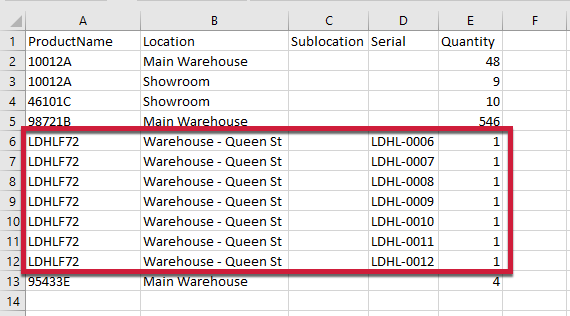
An example of how to set up your spreadsheet is shown below. You will notice product names are repeated for a reason:
- 10012A item is repeated two times, for two different locations (“Main Warehouse” and “Showroom”)
- LDHLF72 item is repeated five times to account for each unique serial number associated with it

If you need help getting started, check out this inventory levels import template!
Saving as a CSV file from Excel
In order to import data which may contain special characters, save as CSV UTF-8 (Comma delimited)
Before you import, make sure your file is saved as a CSV. To do so:
- Choose File > Save As from the drop-down menu.
- At the bottom of this window, you’ll see a field named Save as Type. Choose CSV (comma delimited) from the drop-down.
- Click Save.
- Excel will warn you about the loss of formatting this is not a problem. Please click Yes to complete your save.
Windows
Importing to inFlow

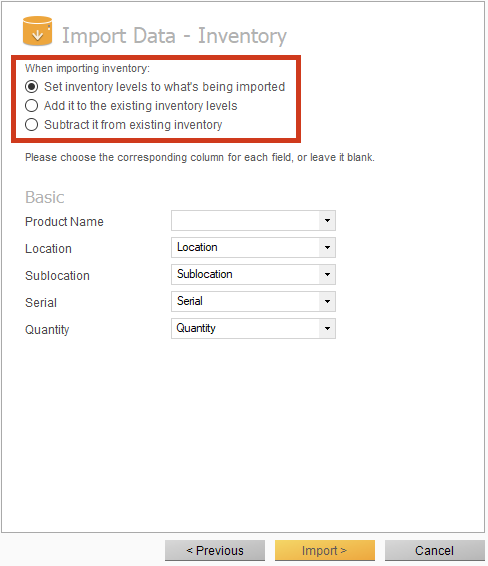
First, go to Main Menu > General > Import Data and select Stock Levels.
You will see the screen above. Choose which one matches the import you’re attempting. Generally, it’s best to set inventory levels to the numbers in your file, but if you are working with a .csv file where the numbers are inventory deducted (instead of the total amount left in stock), then you can use “Subtract from existing inventory“, for example.

Click the Import button and check your current stock!
You can have a look at the sample inventory levels import file and try importing it yourself if you like.
Web
Setting up your spreadsheet file
Start with a spreadsheet and create the following mandatory headers/columns:
- Product
- Location
- Quantity
These are required feels to ensure a successful import. Fill in your spreadsheet with the details of your items. Here are some things to note:
- The Product name in the spreadsheet must exactly match the name in inFlow Cloud.
- If a Product name in the spreadsheet does not exactly match a record found in inFlow Cloud, a new product record will be created for that item.
- You may also add the optional headers/columns of Sublocation and Serial Numbers.
Note: If you intend to track sublocations (optional) such as aisle or bin numbers, be sure to turn the sublocation option on otherwise you won’t see them after the import!
For this type of import, you may repeat the product name multiple times in the spreadsheet; this allows you to specify different quantities, locations, and serial numbers (if applicable) associated with one item
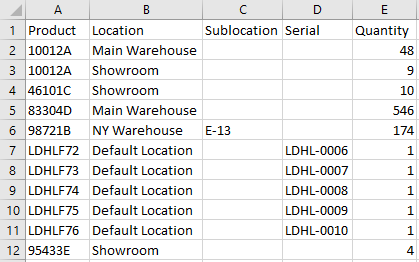
An example of how to set up your spreadsheet is shown below. You will notice product names are repeated for a reason:
- 10012A item is repeated two times, for two different locations (“Main Warehouse” and “Showroom”)
- LDHLF72 item is repeated five times to account for each unique serial number associated with it

If you need help getting started, check out this inventory levels import template!
Saving as a CSV file from Excel
Before you import, make sure your file is saved as a CSV. To do so:
- Choose File > Save As from the drop-down menu.
- At the bottom of this window, you’ll see a field named Save as Type. Choose CSV (comma delimited) from the drop-down.
- Click Save.
- Excel will warn you about the loss of formatting. This is not a problem. Please click Yes to complete your save.
Importing your file into inFlow Cloud
- Log in to the inFlow web app at https://app.inflowinventory.com/login.
- Click on the main menu button (three horizontal bars at the top left of the screen), scroll down, and choose Import.
- From the Data type drop-down, select Stock levels.
- Press on the Select file icon and choose your Excel .csv file.
- On the next screen, you will be able to choose the type of import you want:
- Set inventory levels to what’s being imported
- Add it to the existing inventory levels
- Subtract it from existing inventory
- You will see a preview of your products below with their respective quantities.
- To check the mapping of the fields, click Edit data mapping.
- Match the inFlow fields on the left with your spreadsheet headers/columns (if it’s not auto-mapped for you).
- Click Next.
- You will then see a screen saying your import is in progress! You will receive an email when it’s all done.


0 Comments